4.8. Using IMAS in SMITER
The ITER Integrated Modelling and Analysis Suite (IMAS) and the European Integrated Modelling (EU-IM) effort, in the frame of the EUROfusion Code Development WPCD project, orchestrate the computation of fusion codes with Kepler scientific workflow engine. Complex integrated modelling (IM) workflows developed by the EU-IM Team on top of the Kepler framework, integrate several physics codes involving different time and space scales. The IMAS is a framework based on an underlying Physics Data Model (PDM) that allows the coupling of codes via standardized data structures named IDS (Interface Data Structures). These data structures are served within personal or global databases, and are accessible with several programming languages (Fortran, C++, Java, Python, and Matlab).
IMAS is optional feature that brings IMAS get/put functionality to
SMITER in standalone way. Meaning that IMAS is compiled from ITER GIT
repository and included in SMITER. Local database in SMITER is
created in $HOME/public/imasdb/smiter tree.
To include IMAS in SMITER one needs to specify application.mk build
type such as:
SMITER_APPLICATION ?= smiter-imas-8.5.2
After starting SMITER with IMAS built-in one can test functionality in Python console with:
>>> import imas
>>> help(imas.ids)
Here we will describe how to read meshes from IDS and write meshes to IDS.
4.8.1. Grid description
The grid (or mesh) is an assemblage of multiple connected elements, provided through their geometry data, which as a whole represents a discrete approximation of geometry of a real-life physical object, required for solving physical or mathematical problems like fluid flow and heat transfer, producing virtual presentations of simulations intended for analysis of simulation results and other computing related work in connection with the real-life object.
As previously mentioned, each grid is constructed by many low level components of various geometrical types, hereafter referred to as objects, as the same term is used for geometrical types.
- The main objects forming the grid are:
- points or nodes,
- edges,
- faces, also known as two-dimensional cells, and
- three-dimensional cells
4.8.2. Extracting prepared IDS
To download prepared IDS, run the following commands from salome directory
$ make -C study/imas
This will download and extract the IDS to
~/public/imasdb/smiter/3/0. If loaded module file then user can
recreate IMAS examples with commands like
$ module load SMITER/1.4.0
$ make -C ${SMITER_STUDY_EXAMPLES_DIR}/imas
4.8.3. Reading mesh from IDS
4.8.3.1. ITER vessel mesh
To read the mesh from IDS, activate SMITER module. We already have a prepared IDS with the following settings:
run: 5shot: 4user: $USERdevice: smiter
Where $USER is your system username.
Click on the  or click on
from the menu.
or click on
from the menu.
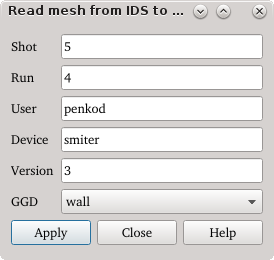
Now change the Run field to 5, Shot field to 4, User to your
system username.
Click Apply. If everything went OK, a message will show in the
end.

Click Ok and afterwards Close.
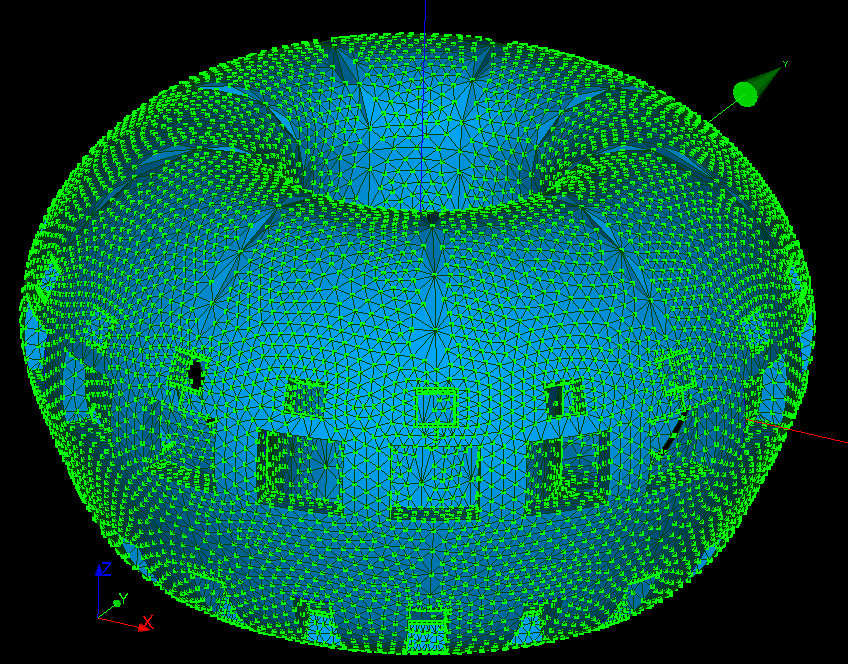
Now we can view the mesh in SMESH module. Activate SMESH
module. View the mesh by right clicking on it in the SALOME Object
browser, in this case right click on
IDS-5-4-edge_profiles-slice-0 in SALOME Object browser and
select Show.
4.8.4. Writing mesh to an IDS
To write a mesh to an IDS, we first have to have a mesh. We will use a
prepared mesh of ITER Vessel which has been meshed with
tetrahedrons. You can use the prepared one and skip the next step, or
do the next step and manually create the Vessel mesh.
4.8.4.1. Creating Vessel geometry
To do this, run SMITER and activate the SMITER module.
Then click on the  to activate the
 Vessel dialog.
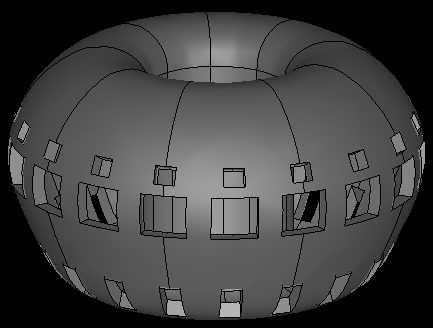
Click on Accept and wait for the Vessel geometry to complete.
A object named “Primitive Vacuum vessel” will show up under Geometry in
SALOME Object browser. To view it, activate the GEOM module and click
on the eye right of the “Primitiv Vacuum vessel” object in the
SALOME Object browser.
4.8.4.2. Meshing Vessel geometry
Now activate the
SMESHmodule. Click on .
For the input geometry, select the Vessel geometry, by clicking on it in the SALOME Object browser.

Now in the
3Dtab, underAlgorithmselectNETGEN 3D.
Right of the
Hypothesisand the input field is a cog wheel. Click on it and selectNETGEN 3D Parameters.
A dialog will show up in which we won’t change anything. Click Ok.
Now switch to the
2Dtab and underAlgorithmselectNETGEN 1D-2D.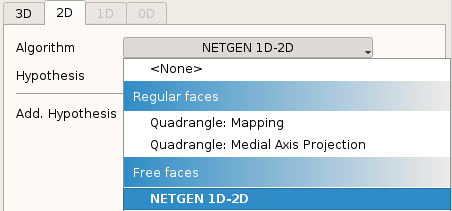
Again click on the
cog wheelthat is right of the input field forHypothesisand selectNETGEN 2D Simple Parameters.
A dialog will open in which we will change the
Number of segmentsvalue from15to5.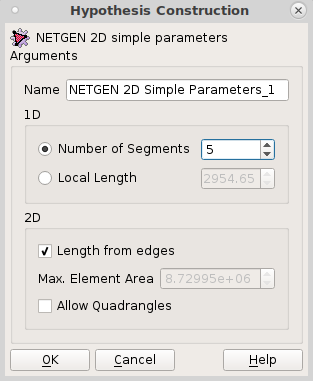
Click Ok and then on the main mesh dialog click Apply and Close.
Now right click on the mesh in
SALOME Object browserand click on Compute.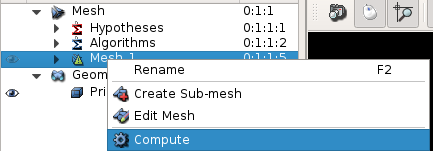
Wait until the meshing is complete.
After it is complete you can right click on the mesh in
SALOME Object browserand click onShowto view the result.
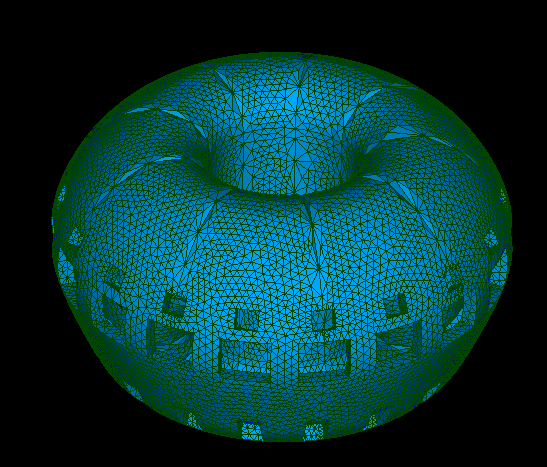
We have a prepared 3D mesh to be written to an IDS.
4.8.4.3. Writing mesh to IDS
Activate SMITER module and click on  icon or from the menu
select .
icon or from the menu
select .
The following dialog will show up.
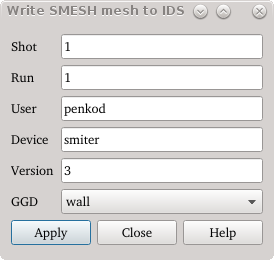
We can change SHOT and RUN values, but the other values should not
be changed.
Now highlight the mesh in the SALOME Object browser. When we click on Apply, all the highlighted meshes will be read and written to the IDS. In this case we will only select one mesh.
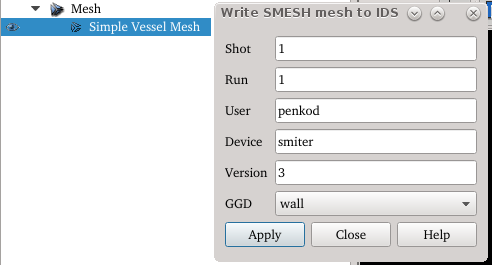
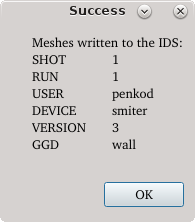
Click Apply and wait until it finishes. A message of success will pop up.
We can go back to Reading mesh from IDS to read the mesh in the newly created IDS.
4.8.5. Reading G-EQDSK from IDS
To read the mesh from IDS, activate SMITER module. We already have a prepared IDS with the following settings:
run: 2shot: 0user: $USERdevice: smiter
Where $USER is your system username.
Click on the  or click on
from the menu.
or click on
from the menu.
Now change the Run field to 2, Shot field to 0, User to your
system username.
Click Apply. If everything went OK, a message will show in the
end.
Click Ok and afterwards Close.
Now the G-EQDSK file with .eqdsk extension can be found at the saved
location. The same G_EQDSK file can be used in the SMITER case computations.
4.8.6. Writing G-EQDSK to IDS
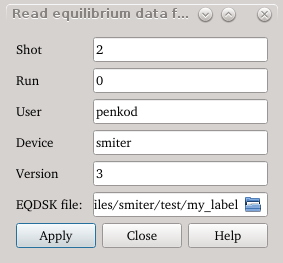
To write an existing G-EQDSK format file to IDS,
first ctivate SMITER module and click on  icon or from
the menu select .
icon or from
the menu select .
The following dialog will show up.

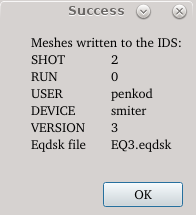
You can change SHOT and RUN values, but the other values should not
be changed.
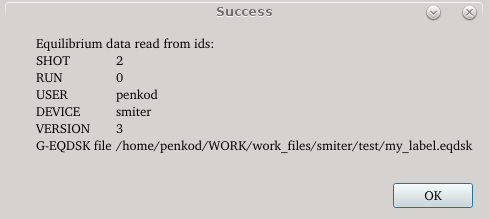
Now select the folder where the file is to be saved and set the file name. When you click on Apply, the contents of the G-EQDSK file will be read from the file and written to the IDS. A message of success will pop up.
You can go back to Reading G-EQDSK from IDS to read the Equilibrium related data from the newly created IDS.